Quantcast
Channel: Crafters In Disguise
Viewing all 121 articles
Browse latest View live

Baby Teemo

$
0
0
 
It's Teemo!
 
I made this costume for my daughter for Halloween. Babies need comfortable costumes so I translated Teemo's outfit into just a simple hat, beard, and booties.
 
 
For the hat I had an adult version I bought from Riot, so I used it as a visual guide to make a baby version out of fleece and flannel.


I added a Velcro chin strap to the hat because babies need one to keep their hat on.


Here she is with her hat!


For the chin beard fur thing I made a bib!


Here are the finished costume pieces!


Soooooo cute!

Click here for my post on making the baby booties.

Custom Buttons from FIMO

$
0
0


I made these custom buttons for my Riven costume. Here is an easy way to make buttons from a product called FIMO.


First, sculpt the shapes with your hands and a few tools. Then bake them in the oven, following the directions on the package. The baking process hardens the polymer.


Next, sand the edges.


 Lastly, paint! I sprayed them black first, then dry brushed on silver.


Coffee Wood Stain

$
0
0


Want to give your wood projects some carmel goodness.  Dunk it some coffee for a few hours :)

Worbla Techniques: Embossed/Relief Patterns

$
0
0
Worbla is a thermoplastic, popularly used for cosplay armor because it is so easy to work with and the resulting armor is quite durable. You can cut it with a good pair of scissors and you can mold it by hand after heating it up. Also, there is virtually zero waste because you can heat up the scraps and use it like clay to create detail ornamentation.

Worbla armor is usually created by sandwiching a stabilizing piece of craft foam between two pieces of Worbla.

Here's how you can create a relief design using inexpensive craft foam instead of using extra layers of expensive Worbla. The relief pattern will have smooth edges like an embossed design; if you layer Worbla instead you will have sharper edges.

You need:
Sheets of craft foam (in two contrasting colors)
Worbla (available from cosplaysupplies.com or yayahan.com)
Heat Gun
A pointy wooden tool
Sharpie for drawing your design
Good scissors
Elmer's glue
A surface to work on that the Worbla will not stick to (I use a piece of glass shelving from IKEA)


Cut out your design in craft foam and glue it to your craft foam pattern piece. Then layer Worbla over the craft foam and use a pointed wooden tool to press the thermoplastic down around the edges of the design.

Let's see an example:


Here I layered my design in green foam over yellow. The yellow will become my pattern piece for an upper-arm plate.


First I heated a piece of Worbla, then stuck the pattern piece on it with the green design side against the shiny side of the Worbla sheet. Then I flipped it over.


Here you can see how it helps to use contrasting craft foam colors. You can see the darker green design through the plastic. I can use my fingers to feel out the design and start to press the Worbla down, but it is much easier if I can see the pattern.


Next, I used the pointy tool to press the heated Worbla down around the design shapes and get nice, smooth edges.


The Worbla cools and hardens pretty quickly so I heated and worked on one quadrant of the piece at a time.


After finishing the relief, I heated a second piece of Worbla and stuck it to the back of the craft foam. Then I pressed the edges together to seal in the craft foam (sandwich!) and trimmed the excess.
 
Save your Worbla scraps, you can heat them up and use them for decorations, like claws and scrollwork!


Lastly I heated up the whole piece and curve it into shape around my upper arm, then let it cool.


Here's the hand plate with ornamentation added. On this piece I used both the craft foam relief technique and also layered strips of Worbla for the edge details.

Comic Book Headband

$
0
0


I got some old comic books and decided to tear apart this Captain America single issue to make a collage.  A collage on what?  A plastic headband.  GEEKY HAIR ACCESSORY ALERT

Tip of the Day: Tulle for Plushie Stuffing

$
0
0
Run out of cotton filling for a plushie project?  Or have too much left over tulle from a wedding?

Fluffed up tulle makes great plush stuffing.


Harley's Hammer

$
0
0
I wanted to dress up as Harley Quinn, but my friends wanted to dress up from Assassin's Creed IV.  So I decided to do a Pirate Harley Quinn to walk around with my pirate friends.

Got a large plastic sheet and spray painted in red


It looks splotchy, but that doesn't bother me.


Covering the plastic sheet with some decorative lace


Got a long cardboard tube (pvc pipes will work as well) and wrapped a decorative ribbon around it.

Drew out where my holes will be when I wrap the circle into a cylinder 


Locking in the pipe from sliding up and down the pipe with some decorative beads


Covered the drum of the barrels with more lace.

HARLEY TIME!


Weird Present Idea for White Elephant Game

$
0
0
There's a fun version of White Elephant Gift Exchange game that our fellowship plays at every Christmas.  Everyone comes with a secret gift.  And we all take turns either opening a gift, or stealing an existing opened gift.  It becomes an alright war in our group.  

If you want to mess with people.  Here's an idea.  Take the most CHEESY item you can find, and pair it with something pretty cool.  That way, when someone wants to steal the present for the cool element.  Everyone can make fun of them for the Cheesy element.

I wonder how many times Justin Bieber will be stolen?


Avalyn's Handy Cosplay Project Planner

$
0
0
Hi everyone, I just wanted to share my handy cosplay planning workbook with three fabulous spreadsheets you can customize for your own project!
  • Do you have trouble finishing a cosplay project before the next convention?
  • Do you find yourself spending too much money on your costumes?
  • Are you taking on a big costume build with too many things to keep track of in your head?
  • Have you ever made an awesome costume on time but forgot to buy the wig and allow time for shipping?
If any of this sounds familiar, then maybe this workbook will help you get organized for your next project. Or maybe you are a spreadsheet geek and have your own methods, but are looking for some new ideas. Either way, check it out!

With this workbook you can:
  • Plan out each Phase of your project
  • Create a project Timeline
  • Track your Purchases
  • Make a Budget
Click here for Avalyn's Handy Cosplay Project Planner
(Hosted on Google, Yes it's FREE to download)
Select File
Download it to your computer.
Save and Open the file from your computer.
Read the Instructions to learn how to customize the workbook for your own project.


Feel free to leave me your feedback! Is it too complicated? Is it useful to you?


Frosting Technique

$
0
0
To dull some shine, and leave a frosted coating.  Try coating your object in some white glue.


Turn Shoes into Furry Winter Boots

$
0
0
Sure, be all '80s and call these leg warmers. Or call them "leg corsets" or "boot uppers". They transform any shoes into fur-trimmed boots!


They were fairly quick and easy to make, even though I hadn't worked with fur before. I made them for my Diablo 3 cosplay (currently in progress), but they are also very festive for the winter holidays! I may even wear them to a Seahawks game.

Here they are pictured with the clawed footwear (still in raw Worbla, not painted yet) that I am working on for the Barbarian costume.


I'll include some construction notes here in case anyone is interested in making something similar.

Disclaimer: I plan to reinforce these later, to make them less slouchy, perhaps using Buckram or boning.

Materials:
  • 2 packs of 13 Large Grommets (I used 20 grommets total)
  • White "Mongolian" faux fur, long-haired (fabric.com)
  • Suede fabric
  • Black Grossgrain ribbon (for lacing)
Construction Notes:

Start by creating a pattern of your leg. Cover your leg in plastic wrap, then masking tape, mark a line where the top and bottom edge should be, draw a line down the center front, then cut down the center front line and you've got your pattern. You can allow for the curve of the calf by snipping the pattern from the top down about 4 inches in two or three places to create darts.

Cut the suede using your pattern. I serged the front and top edges - a roll hem would also work - and just cut the bottom edge since this fabric doesn't fray easily.

When dealing with long fur, use a comb! Figure out which direction is "down" when you look at the fur and how it is laying. When you cut the fur you can try and slide your shears against the fabric to "part" the hairs, and that will give you less cropped short hairs at the bottom.

The fur strips are 4" wide on top and 3" wide on the bottom. Start with a wider option because you can always trim it later.


For the bottom fur, on my "boots" this is not attached, it is just like an anklet I slid on over my foot, and this works because there is a little bit of stretch to the fur fabric. I serged the top edge, left the bottom edge raw (it's hidden and fray-resistant) and sewed the two 3" end together to make a loop.

After sewing the fur onto the suede, I added grommets. After marking the placements with chalk, I use a hole punch to make holes down both sides before I go get my hammer out and start pounding away. A regular hole punch is the right size to get a hole started for Large grommets.

Merry Christmas

$
0
0
Grinch and Max say Merry Christmas :)


Plants in Rings?

$
0
0
Last weekend I visited a the Got Craft, craft fair in Vancouver BC and came across this interesting artist Lara Lepper that used 3D printing to print plant pots as a jewelry piece.  She used air plants which look pretty, yet are easy to manage.  Just a really creativ piece I felt the need to share it


Clothing Pattern

$
0
0
A few years ago I got boyfriend a pair of Stewie Vader PJ pants.  Tee Hee Hee, they were more ofr me than him.  This year I found an awesome print at the fabric store.  BIG BANG THEORY SUPER HEROS!!!!!


I've decided to make him new pajama pants for Christmas.  I can't measure him, and I"m too lazy to get a pattern from the store.  What to do?  Let's steal his pants and use them to copy a pattern and cut out the fabric just as is.


GeorgeTown Trailer Park Mall

$
0
0
I came across his really unique scene I had to share with folks. 


  In Georgetown (Seattle neighborhood) there is this Trailer Park Mall. 


Welcome to the stores, they sell either antiques or art work.


Look she turned the drivers cabin into an office space. 


If you want to find out more, they have a website  http://www.georgetowntrailerpark.com/


Wonderflex Armor

$
0
0
Thermoplastics are all the rage for cosplayers in the convention circuit right now. You may have even heard of some these fun names: "Friendly Plastic", "Wonderflex", and "Worbla". But how do they work? What's the difference between Worbla and Wonderflex? And how do you even start using something like this?

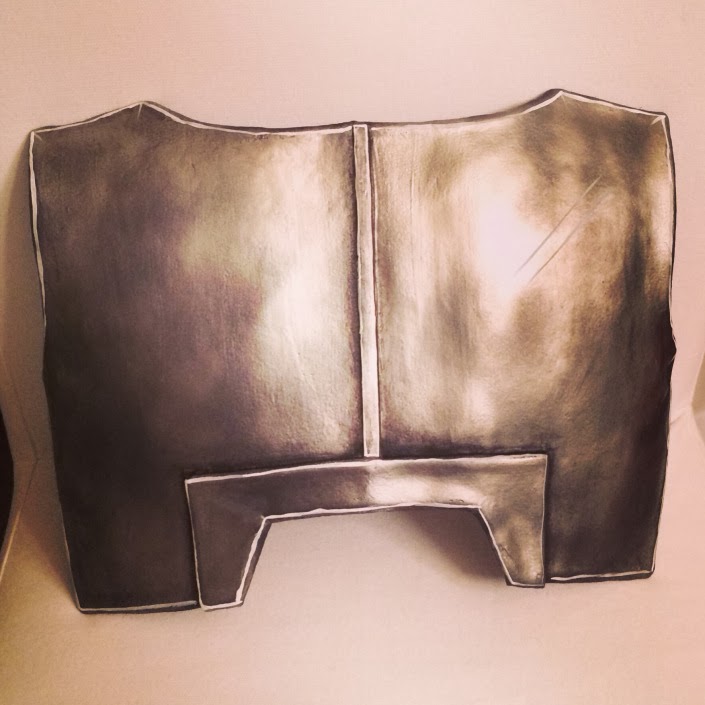
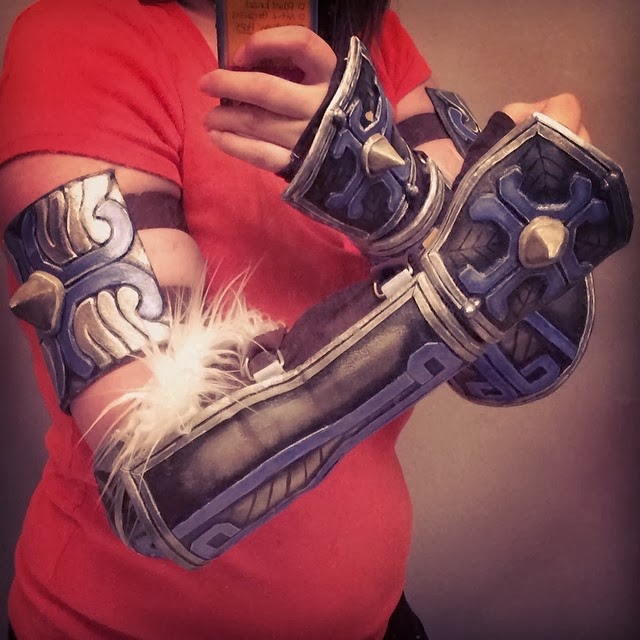
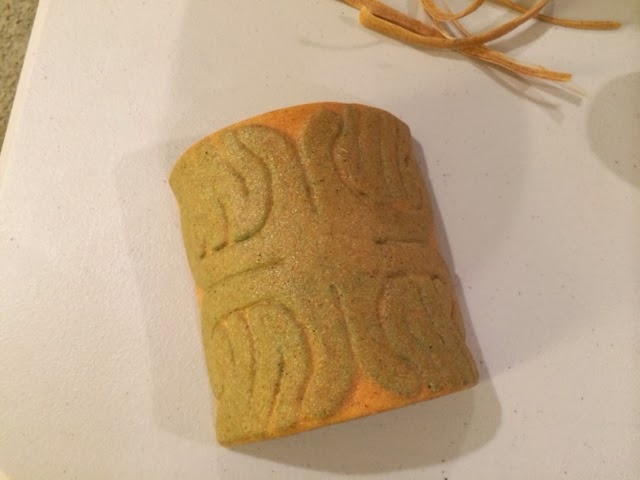
Let's start with a brief overview of Wonderflex and how you might use it in your costume-making, using an example. Here is a very simple piece of armor I made out of Wonderflex, it is a back plate (quite literally a plate you wear on your back):


So how do you even begin to make something like this? Well, if you know how to use scissors, Sharpies, a hair dryer, a paintbrush, and a ruler, then you have all of the skills you need!

Wonderflex starts in a rolled-up sheet. When you heat it up you can bend it into shape, then cool it fast (dunk it under cold water) and it will harden and hold its shape. It also sticks to itself so you don't need to use a glue gun.

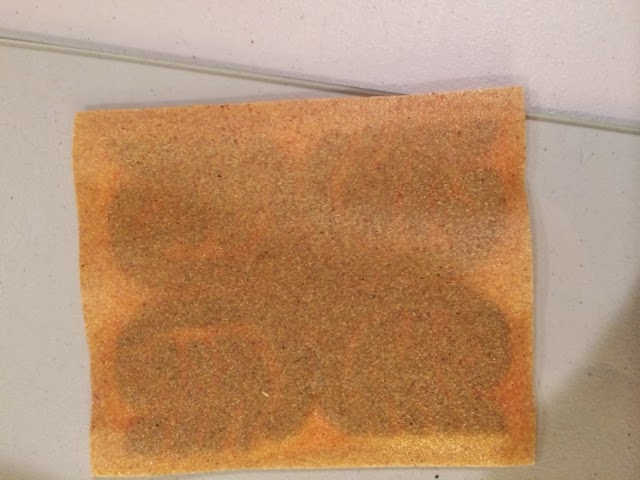
You can form structure of your armor piece by sandwiching a piece of craft foam between two pieces of Wonderflex (this is the same process for Worbla armor). Start by creating a pattern on butcher paper, then trace that pattern onto sheets of craft foam. Then trace each piece of foam onto Wonderflex (twice), leaving about 1/4" extra around the edge (like a "seam allowance" if this was fabric). Heat up both pieces of Wonderflex with your heat gun until they are all soft and floppy, then sandwich the craft foam between the Wonderflex. You can fold the excess edges over to the back side of the armor piece and press them down. Mold it into the curved shape you want by pressing it against your bold, then cool it quickly under cold water.


After you have built the piece, you can prime it and paint it. In the images above, you can see how I primed it with gesso and wood glue. Then I sprayed on a black primer and silver spray paint. Then I did a black wash and dry brush with black acrylic paint. Lastly, I added white line details for highlights to give it some pop and character.

Wonderflex is a little cheaper than Worbla, but in my opinion it is more difficult to work with (not as forgiving). With Worbla, you can use all of your scraps by melting them down and molding them like hot clay - you can't do that with Wonderflex. Worbla stretches and can be molded into bra cups, but Wonderflex can't stretch much because it has a fabric structure. Wonderflex is slightly stronger in a single or double-layer though because of that fabric structure. It's also smoother in texture than Worbla.

So these are my two recommendations. Use Wonderflex for:
- straps/loops for affixing D-rings to thermoplastic armor (recommend using 2 layers)
- large structures that require a lot of plastic which you want to do as cheaply as possible (like the armor piece above)
- thin, delicate items made with a single flexed sheet, like custom masks.

Stayed tuned for Worbla armor!

Where can you get Wonderflex? I bought mine at cosplaysupplies.com

Softening Crafting Leather

$
0
0
Leather found at craft stores isn't high quality, rather think, and minimally treated. If you ever find it in an misbent shape or curly from being wound on a spool, fear not, it's quite easy to fix.


I purchased a spool of leather cord for some necklaces, but they came out with this intense curl which was hard to straighten.


Didn't think you can put it in hot water?  Well if it's not fancy treated, you actually can.  I soaked the leather in hot water, a treatment also used to soften the leather before stamping, a method I learned from some real CowBoys!


Hang to dry.  But be careful of the position in which it dries, it will keep it's shape as well.  My ending strands ended up with a fold in the middle, luckily I didn't mind because that's where my pendant for my necklace is going to sit anyways.


TaDa, from Curly to Straight (ish)


Worbla Armor - Embossed Technique

$
0
0
 Here's a sneak preview of the Diablo III Barbarian Tier 5 armor I am building. All of these pieces were made using a thermoplastic called Worbla.


One reason you might use Worbla instead of Wonderflex to create your cosplay armor is in the unique ways that you can manipulate Worbla.

Here's how I create a embossed look on Worbla armor. This technique is more cost-effective than layering extra Worbla on top. Instead, you are layering your less-expensive (and easier-to-cut) craft foam.
You need:
Sheets of craft foam (in two contrasting colors)
Worbla (available from cosplaysupplies.com or yayahan.com)
Heat Gun
A pointy wooden tool
Sharpie for drawing your design
Good scissors
Elmer’s glue
A surface to work on that the Worbla will not stick to (I use a piece of glass shelving from IKEA)


First, cut out your design in craft foam and glue it to your craft foam pattern piece. Then layer Worbla over the craft foam and use a pointed wooden tool to press the thermoplastic down around the edges of the design. Let’s see an example:
WorblaDesign2
This is going to be a plate that wraps around the outside of my upper arm.
Here I layered my design in green foam over yellow. The yellow will become my pattern piece for an upper-arm plate.
First I heated a piece of Worbla, then stuck the pattern piece on it with the green design side against the shiny side of the Worbla sheet.
WorblaDesign3
Then I flipped it over.
WorblaDesign4
Here you can see that it helps to use contrasting craft foam colors because you can see the darker green design through the plastic.
Next, I used the pointy tool to press the heated Worbla down around the design shapes and get nice, smooth edges.
WorblaDesign5
The Worbla cools and hardens pretty quickly so I heated and worked on one quadrant of the piece at a time.
WorblaDesign6
After finishing the relief, I heated a second piece of Worbla and stuck it to the back of the craft foam. Then I pressed the edges together to seal in the craft foam (sandwich!) and trimmed the excess.
Save your Worbla scraps, you can heat them up and use them for decorations, like claws and scrollwork!
WorblaDesign7
Lastly I heated up the whole piece and curve it into shape around my upper arm, then let it cool.
WorblaDesign8
Here is the completed piece after adding the spike and painting it.
WorblaDesign10
In this last image you can see the hand plate on which I used both the craft foam relief technique and also layered strips of Worbla for the edge details. Here it is easy to see the visual difference you get – with the relief technique you will have smooth, rounded edges, and with the layering technique you will have sharp edges., which looks great for border outlines.
Did you know? Worbla (or "Worbla's Finest Art") is made from renewable natural raw materials is also known as Rhenoflex RX 5050 which was originally engineered by a German company for the purpose of industrial shoe-making. You can buy it in the U.S. from cosplaysupplies.com or yayahan.com

Minion Goggles

$
0
0

As you can see I have a base pillow thing that will soon become my Minion (Despicable Me). Along with some spare parts of all stuff.  
  • Blank Minion Body
  • Stretchy Black Elastic
  • Mason Jar Lids (2x)
  • White Eyes, using white fleece
  • Black Pupils, using wood circle pieces that are painted black


Using the Mason Jar bases I am able to make perfect cirles for the eyes


These wood blocks were suppose to be pendants, an unfinished project that is now re purposed for the pupils.


Measuring the goggle headband right on Dave (Minion's name is Dave)


Glue the headband to the mason jar lids


Using the Mason jar rings to make the goggle frames and we have MINION GOGGLES


Cosplay Puffy Pants

$
0
0

My friend (the one in the Wartortle outfit in the picture below) asked me.  How did you get/keep your pants to puffy.  


 Time for some cosplay magic! Well first you need to start with some Hammer Pants.  The pant legs aren't straight, nor flared. Instead it's pretty much a silly bubble.


Oh look? some left over tulle, several yards in fact.  Wrap several layers into a loose circle and tie it off with (oh look some leftover) ribbon.  


Next slip in one of these bundles in each pant leg/sleeve.  What's great is tulle and ribbon is completely machine washable, and completely squish-able into boxes for storage.  Or repack-able into plushie stuffing for future projects.


YAY!
Thank you Cowslip for such amazing Pokemon Gijinka Cosplay designs. http://imgur.com/a/DDxvd#16
And DTJAAAM for this wonderful picture http://www.dtjaaaam.com/
Viewing all 121 articles
Browse latest View live